Automating Video Player Integration Tests using Playwright and Open Source Cloud
Even the most basic video player integration tests can be challenging to automate especially when you want to verify that the video player is behaving correctly when something bad happens with the stream. To facilitate for this scenario we built and open sourced the Chaos Stream Proxy. In this blog I will give an example on how you can automate video player integration testing using Playwright and Chaos Stream Proxy hosted in Open Source Cloud. Tests that you can run in your CI/CD workflow on GitHub or your preferred build pipeline.
Bringing controlled chaos to your stream
The Chaos Stream Proxy is a proxy that sits between “perfect” live or VOD streams and introduces errors in the stream based on your instructions. For example to have the second video segment to timeout you can pass on the URL below to the video player.
https://<chaos-stream-proxy>/api/v2/manifests/hls/proxy-master.m3u8?url=<vodUrl>&timeout=[{i:1}]
This means that the second segment (index starts on 0) in the <vodUrl> will fail to be downloaded.
The quickest way to get started is to signup for an Open Source Cloud account where you have the possibility to launch your own instance of the Chaos Stream Proxy without having to setup your own infrastructure for it.
Setup an example video player
In this example we will build a video player based on our web-player library that are capable of playing both HLS and MPEG-DASH streams. First let us initiate a new node project.
npm initIt doesn’t matter that much what you enter here now. Then we install the web-player-core library.
npm install --save @eyevinn/web-player-coreThen we create a simple HTML page in our project folder player/index.html
<!DOCTYPE html>
<html>

<head>
  <meta charset="utf-8">
  <meta http-equiv="X-UA-Compatible" content="IE=edge">
  <title>Web Player Example</title>
  <script type="module" src="./index.js"></script>
</head>
<body>
  <input
    type="text"
    name="manifest-url"
    id="manifest-input"
    placeholder="Paste a Stream URI here..."
  />
  <button id="load-button">LOAD</button>
  <div id="player"></div>
</body>
</html>
and a Javascript file player/index.js for our video player.
import WebPlayer, { PlayerEvent } from '@eyevinn/web-player-core';

async function main() {
  const manifestInput = document.querySelector('#manifest-input');
  const loadButton = document.querySelector('#load-button');

  const root = document.querySelector('#player');
  const video = document.createElement('video');
  root.appendChild(video);

  const player = new WebPlayer({
    video: video
  });


  player.on(PlayerEvent.ERROR, ({ errorData, fatal }) => {
    console.error(JSON.stringify(errorData));
  });

  async function load() {
    console.log('Loading manifest:', manifestInput.value);
    await player.load(manifestInput.value, true);
  }

  loadButton.onclick = async () => {
    await load();
  };
}

window.onload = main;
Then we use parcel to make a web-bundle and uses the in-built server to serve the bundle.
npm install --save-dev parcelAnd add the following line to the scripts section of the package.json file
"player": "parcel -p 1234 player/index.html --no-cache"You can try this out by running npm run player and open a browser to http://localhost:1234
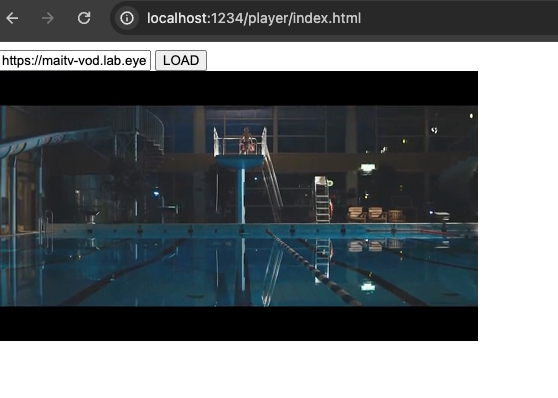
Enter a URL to a video stream and press the LOAD button and you will see a video being played.
End-to-end testing with Playwright
Now we can install Playwright, a framework for scripting end-to-end browser tests for modern web browsers.
npm install --save-dev @playwright/testThen we will create a configuration file playwright.config.ts in the project root folder.
import { PlaywrightTestConfig, devices } from '@playwright/test';

const config: PlaywrightTestConfig = {
  testDir: "tests/",
  use: {
    trace: 'on-first-retry',
    // Necessary to get the media codecs to play video (default 'chromium' doesn't have them)
    channel: 'chrome'
  },
  webServer: {
    command: 'npm run player',
    port: 1234,
    reuseExistingServer: true,
  },
  projects: [
    {
      name: 'setup csp',
      testMatch: /global\.setup\.ts/,
      teardown: 'cleanup csp'
    },
    {
      name: 'cleanup csp',
      testMatch: /global\.teardown\.ts/
    },
    {
      name: 'chromium with csp',
      use: {
        ...devices['Desktop Chrome'],
        launchOptions: {
          args: ['--disable-web-security']
        }
      },
      dependencies: ['setup csp'],
    }
  ],
};
export default config;
We will not go through all bits and pieces here in detail. More information can be found on the documentation site for Playwright, but we will highlight the parts relevant for this example.
To serve the video player web application we can use the video application we developed, bundle and serve it with parcel. We configure Playwright to first set this up by running the npm run player command that we just shown.
Setup Chaos Stream Proxy
Then we define a global setup and teardown script that are run before any tests are being executed. In these scripts we will launch and remove an instance of the Chaos Stream Proxy. To be able to do that we need to first install the client library for the Open Source Cloud API.
npm install --save-dev @osaas/client-coreThen let us have a look at the setup script first placed in the folder tests and called global.setup.ts
import { test as setup } from '@playwright/test';
import { Context, createInstance } from '@osaas/client-core';

const delay = ms => new Promise(res => setTimeout(res, ms));

setup('create a chaos stream proxy', async ({}) => {
  console.log('Creating Chaos Stream Proxy in Open Source Cloud...');

  const ctx = new Context();
  try {
    const serviceAccessToken = await ctx.getServiceAccessToken(
      'eyevinn-chaos-stream-proxy'
    );
    const instance = await createInstance(
      ctx,
      'eyevinn-chaos-stream-proxy',
      serviceAccessToken,
      {
        name: 'webplayer'
      },
    );
    await delay(5000);
    process.env.CSP_URL = instance.url;
  } catch (err) {
    console.error('Failed to create Chaos Stream Proxy:', err);
  }
});
We first create an Open Source Cloud context and then we obtain a Service Access Token for the Chaos Stream Proxy service. We name the instance webplayer and wait for 5 seconds before we store the URL to the proxy as an environment variable. We need to wait about 5 seconds for the instance to be created and stabilized.
Then let us look at the teardown script that we place in the same folder and give the name global.teardown.ts
import { test as teardown } from '@playwright/test';
import { Context, removeInstance } from '@osaas/client-core';

teardown('remove chaos stream proxy', async ({}) => {
  console.log('Removing Chaos Stream Proxy in Open Source Cloud...');

  const ctx = new Context();
  try {
    const serviceAccessToken = await ctx.getServiceAccessToken(
      'eyevinn-chaos-stream-proxy'
    );
    await removeInstance(
      ctx,
      'eyevinn-chaos-stream-proxy',
      'webplayer',
      serviceAccessToken
    );
  } catch (err) {
    console.error('Failed to remove Chaos Stream Proxy:', err);
  }
});
In this case we don’t need to wait for the instance to be completely removed.
Writing our test
Now that we have everything facilitated for the tests we can start writing our tests. If you recall in our video player application we are listening for the player error events and on error just prints it on the console log. Here you normally would send this to a player analytics backend for reporting and analysis.
player.on(PlayerEvent.ERROR, ({ errorData, fatal }) => {
  console.error(JSON.stringify(errorData));
});
So what we want to do with our first test is to validate that this event is handled and the player application we wrote acts as intended. In this case just prints the error payload as a stringified JSON.
We create a file in our tests folder that we call error-reporting.spec.ts and start with the following lines.
import { test, expect } from '@playwright/test';

test('emits player error event on segment timeout', async ({ page }) => {
  const cspUrl = `${process.env.CSP_URL}/api/v2/manifests/hls/proxy-master.m3u8`;
As you can see we obtain the URL to the Chaos Stream Proxy through the environment variable that was set during setup.
  const testVod = 'https://maitv-vod.lab.eyevinn.technology/VINN.mp4/master.m3u8';
  const corruptionUrl = `${cspUrl}?url=${testVod}&timeout=[{i:1}]`;
Then we construct our corrupted VOD by using a good VOD that we pass to the proxy with the instruction to add a timeout on the second video segment. Next thing is to load the video player application and fill in the URL and click the load button. This time we do it with code.
  await page.goto('index.html');
  await page.locator('#manifest-input').fill(corruptionUrl);
  await page.locator('#load-button').click();
  await page.locator('video').waitFor();
We wait for the video element to be visible before we continue. Here we wait for a console output that we then parse so we can verify that the error thrown by the player is indeed a network error.
  const msg = await page.waitForEvent('console');
  const error = JSON.parse(msg.text());
  expect(error.category).toEqual('networkError');
});
Putting this all together we have.
import { test, expect } from '@playwright/test';

test('emits player error event on segment timeout', async ({ page }) => {
  const cspUrl = `${process.env.CSP_URL}/api/v2/manifests/hls/proxy-master.m3u8`;

  const testVod = 'https://maitv-vod.lab.eyevinn.technology/VINN.mp4/master.m3u8';
  const corruptionUrl = `${cspUrl}?url=${testVod}&timeout=[{i:1}]`;
  await page.goto('index.html');
  await page.locator('#manifest-input').fill(corruptionUrl);
  await page.locator('#load-button').click();
  await page.locator('video').waitFor();

  const msg = await page.waitForEvent('console');
  const error = JSON.parse(msg.text());
  expect(error.category).toEqual('networkError');
});
Now it is time to actually try this out. Before running the test we need to install dependencies that playwright has.
npx playwright install --with-depsThen we can execute the test
OSC_ACCESS_TOKEN=<osc-personal-access-token> npx playwright testThe OSC_ACCESS_TOKEN is your personal access token that you find in Open Source Cloud under settings.
Adding this test to your build pipeline in GitHub
Now we can add this test to be executed for example on all pull-requests in GitHub using a GitHub workflow.
name: Run integration tests
on: [pull_request]

jobs:
  test:
    if: "!contains(github.event.pull_request.title, 'WIP!')"
    runs-on: ubuntu-latest
    steps:
    - uses: actions/checkout@v2
    - uses: actions/setup-node@v2
      with:
        node-version: '21.x'
    - name: Install dependencies
      run: npm ci
    - name: Install Playwright
      run: npm run test:install
    - name: Run Playwright tests
      run: npm test
      env:
        OSC_ACCESS_TOKEN: ${{secrets.OSC_ACCESS_TOKEN}}
assuming that the scripts-section of your package.json contains
  "scripts": {
    "player": "parcel -p 1234 player/index.html --no-cache",
    "test:install": "playwright install --with-deps",
    "test": "playwright test"
  },
This was a basic example on what you can do and I hope this will serve as an inspiration. This example and other examples of automating testing in video streaming context will be included in my talk at Streaming Tech Sweden 2024 on May 23 in Stockholm this year.
Thank you for your time!
/Jonas Birmé VP R&D Eyevinn Technology
What is Open Source Cloud
A software as a service based on open source with a unique transparent model where revenue is shared with the open source authors. Open Source Cloud offers media industry companies a quick way to incorporate open source in their solutions and the option to run the same software in-house as the source code is publicly available.